Raspberry Pi P2P Setup: A Simple, Secure Guide [Updated]
Ever felt limited by centralized networks and yearned for a direct, secure connection between your devices? The answer lies in harnessing the power of the Raspberry Pi to create your own peer-to-peer (P2P) network, offering unparalleled control and privacy.
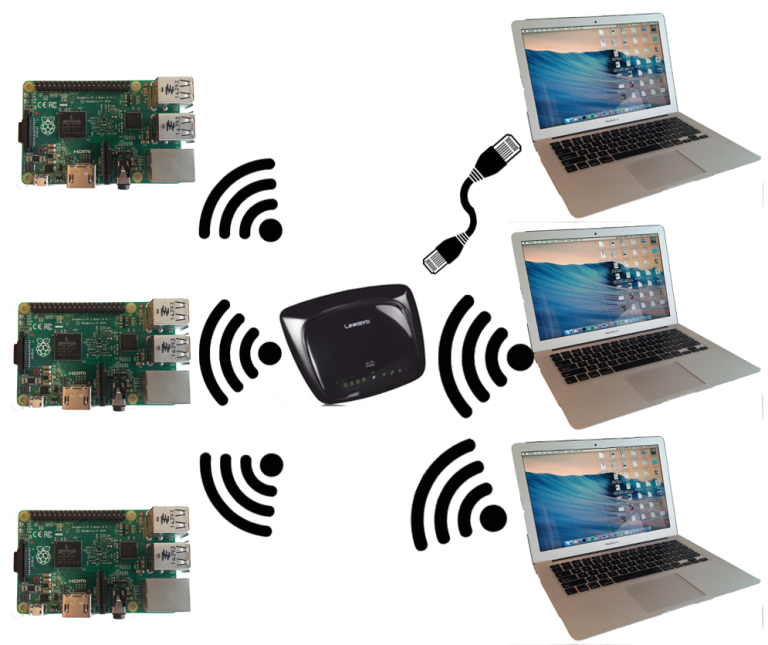
Setting up a raspberry pi p2p setup might seem daunting at first, but with a clear understanding of the process, it becomes a remarkably accessible and rewarding project. The beauty of a P2P network lies in its decentralized nature, eliminating the need for a central server and allowing devices to communicate directly with each other. This is particularly useful for applications where security, speed, and offline functionality are paramount. Whether you're looking to establish a secure file-sharing system, build a robust IoT infrastructure, or create a local network independent of the internet, the Raspberry Pi offers a versatile and cost-effective solution.
| Category | Information |
|---|---|
| Device | Raspberry Pi 3 B+ (recommended, but other models can work) |
| Operating System | Raspberry Pi OS (formerly Raspbian) |
| Connectivity | Wi-Fi (built-in or via USB dongle) |
| Use Case | Secure file sharing, IoT projects, offline networks |
| Key Concepts | P2P (Peer-to-Peer), Group Owner, Client |
| Configuration File | wpa_supplicant.conf |
| P2P Intent Values | 0 (client), 15 (group owner), 1-14 (probability of becoming group owner) |
| Command Examples | set config_methods virtual_push_button, p2p_stop_find |
| Additional Hardware | USB Wi-Fi dongle (if built-in Wi-Fi is insufficient or for dual-band support) |
| Related Concepts | Virtual Private Cloud (VPC), IoT (Internet of Things) |
| Reference Link | Raspberry Pi Official Documentation |
The journey begins with selecting the right hardware. While various Raspberry Pi models can be used, the Raspberry Pi 3 B+ and later versions are generally recommended due to their improved processing power and built-in Wi-Fi capabilities. However, if you're using an older model or require dual-band Wi-Fi support, an additional USB Wi-Fi dongle that registers an interface like wlan1 becomes essential. Installing the operating system is the next crucial step. Raspberry Pi OS, formerly known as Raspbian, is the go-to choice for most users, offering a stable and well-supported environment for setting up your P2P network. The official documentation provides comprehensive guides on installing the operating system, whether through a direct image write to an SD card or via a network install, which eliminates the need for a separate SD card reader.
- Unleashing The Power Of Filmyzilla Bengali Movie Downloads And Mp4moviez
- Filmyfly 2025 Sikandar The Ultimate Guide To Your Favorite Movie Download Hub
Once the operating system is installed, the real magic begins: configuring the network settings to establish the P2P connection. This involves modifying the `wpa_supplicant.conf` file, which controls the Wi-Fi connections on your Raspberry Pi. The key to setting up a P2P network lies in understanding the `p2p_go_intent` option. This parameter dictates the role your Raspberry Pi will play in the P2P network: either as a group owner or as a client. A value of 0 forces the Raspberry Pi to act as a client, while a value of 15 designates it as the group owner, responsible for managing the network and authenticating devices. Values between 1 and 14 represent a probability, with 7 indicating a 50% chance of becoming the group owner. In scenarios where you want to ensure that a specific Raspberry Pi always acts as the group owner, setting `p2p_go_intent=15` is the definitive solution. However, if both devices have a `p2p_go_intent` value other than 0, negotiation will take place, and the device with the higher value will typically become the group owner.
The configuration process doesn't end with setting the `p2p_go_intent`. You also need to configure the Wi-Fi Direct settings. This often involves specifying the desired network name (SSID) and passphrase for the P2P network. These settings will be used by the client devices to connect to the Raspberry Pi group owner. Its crucial to choose a strong and unique passphrase to protect your P2P network from unauthorized access.
Beyond basic connectivity, security should be a paramount concern when setting up a raspberry pi p2p setup. While P2P networks inherently offer a degree of isolation from the external internet, they are not immune to security threats. Employing strong passwords, enabling encryption (WPA2 or WPA3), and regularly updating your Raspberry Pi's operating system are vital steps in safeguarding your network. For even greater security, consider implementing a virtual private cloud (VPC) network, which adds an extra layer of protection by isolating your P2P network within a secure and controlled environment.
- Join Somali Wasmo Telegram Channels Now Your Gateway To Community And Connection
- Movierulz Ibomma Telugu Movies New 2023 Your Ultimate Guide To Streaming Blockbusters
Consider the scenario where you have two Linux boxes, an Intel-based mini PC streaming SDR (Software Defined Radio) software and a Raspberry Pi acting as the client. You need to link these two boxes over Wi-Fi, but you don't want to rely on a traditional router or access point. This is where the raspberry pi p2p setup shines. By configuring one of the Raspberry Pis as the group owner, you create a direct, secure connection between the two devices, enabling seamless streaming of the SDR data. This approach eliminates the potential bottlenecks and security risks associated with routing traffic through an external network.
Understanding the nuances of Wi-Fi Direct is crucial for troubleshooting potential issues. Wi-Fi Direct, also known as P2P Wi-Fi, allows devices to connect to each other without requiring a traditional wireless access point. However, certain factors can hinder the establishment of a P2P connection. These include incompatible Wi-Fi standards, interference from other wireless devices, and incorrect configuration settings. If you encounter difficulties, consult the official Raspberry Pi documentation and online forums for solutions. Often, the answer lies in carefully reviewing your configuration files and ensuring that all devices are using compatible settings.
Furthermore, the command `set config_methods virtual_push_button` or `set config_methods keypad` plays a role in how the Raspberry Pi announces itself to the wireless network during the P2P discovery process. These methods dictate the user interface interaction required to initiate the connection. The `virtual_push_button` method typically involves pressing a button on the Raspberry Pi (either physically or virtually through a software interface) to confirm the connection, while the `keypad` method requires entering a PIN code. Before changing the method, it is crucial to issue the command `p2p_stop_find` to ensure that the Raspberry Pi is not actively searching for P2P devices. It's important to note that clients might cache the announced configuration method for a period, so changes might not take effect immediately.
The versatility of the raspberry pi p2p setup extends far beyond simple file sharing and media streaming. It can be used to create sophisticated IoT networks, enabling devices to communicate directly with each other without relying on a centralized cloud platform. This is particularly valuable in environments where internet connectivity is unreliable or unavailable, such as remote locations or disaster-stricken areas. Imagine a network of sensors and actuators in a remote agricultural setting, all communicating directly with each other through a Raspberry Pi-based P2P network. This allows for real-time monitoring and control of environmental conditions, even without an internet connection.
Moreover, mastering the remote management of your Raspberry Pi is essential for maintaining and troubleshooting your P2P network. Tools like remote iot management platform allow you to access and control your Raspberry Pi from anywhere in the world, enabling you to monitor its performance, update its software, and diagnose any issues that may arise. This is particularly useful for P2P networks that are deployed in remote or difficult-to-access locations.
However, setting up a reliable P2P connection between a Raspberry Pi and an Android phone requires specific steps. First, you must configure the Raspberry Pi as the P2P group owner, ensuring that it is broadcasting its presence to nearby devices. Then, on the Android phone, you need to enable Wi-Fi Direct and search for available P2P devices. Once the Raspberry Pi is discovered, you can initiate the connection process, which may involve entering a PIN code or confirming a connection request. After the connection is established, you can use various apps and protocols to communicate between the Raspberry Pi and the Android phone, enabling file sharing, remote control, and other functionalities.
After spending considerable time navigating forums and experimenting with different configurations, many users have stumbled upon successful setups for their raspberry pi p2p setup. These experiences highlight the importance of patience, persistence, and a willingness to learn from others. The online community is a valuable resource for troubleshooting issues, sharing best practices, and discovering new and innovative ways to utilize the Raspberry Pi in P2P networks.
In conclusion, establishing a raspberry pi p2p setup offers a powerful and flexible way to create secure, direct connections between devices. Whether you're a tech enthusiast, a developer, or simply someone looking to enhance your network security and functionality, the Raspberry Pi provides the tools and resources you need to build your own peer-to-peer network. By understanding the underlying concepts, carefully configuring your devices, and leveraging the wealth of information available online, you can unlock the full potential of P2P networking with the Raspberry Pi.
It's also important to remember that you might need additional software packages. For example, you might encounter dependencies during the installation process. In such cases, the system will usually prompt you to install the necessary packages. For instance, you might see a message indicating that `libncurses5` needs to be installed. The command line will then indicate that `libncurses5` is newly installed, with no packages upgraded or removed. It's a standard part of the software installation process.
The official documentation for Raspberry Pi computers and microcontrollers is an invaluable resource. It provides detailed information on everything from hardware specifications to software configuration, including comprehensive guides on setting up Wi-Fi and networking. The documentation is regularly updated, ensuring that you have access to the latest information and best practices. Consulting the official documentation is highly recommended for anyone embarking on a raspberry pi p2p setup.
Securely connect remote iot p2p raspberry pi download windows a.
- Hdhub4u Bollywood Hindi Dubbed Movies Your Ultimate Streaming Hub
- Vegamovies More Your Ultimate Guide To Bollywood Streaming And Watch Now
Mastering Raspberry Pi P2P Network Setup A Comprehensive Guide

Raspberry Pi Setting up Wifi direct (wifi p2p) and DHCP server YouTube
Setup Raspberry Pi Networking in a Classroom or Camp
